DLNA/UPnP 클라이언트 또는 Android용 MediaMonkey(MMA)와 같은 Wi-Fi 동기화 클라이언트는 다양한 네트워킹, 보안/액세스 제어 문제 또는 서버에서 가용성을 알리거나 콘텐츠를 공유하지 못하게 하는 구성 문제로 인해 Windows용 MediaMonkey(MMW) DLNA 서버에서 공유하는 콘텐츠에 액세스하지 못할 수 있습니다. MediaMonkey에서 Chromecast/DLNA 클라이언트로 캐스트/스트리밍하는 경우 MediaMonkey는 방화벽에서도 액세스해야 합니다. MediaMonkey에서 미디어 서버가 활성화되지 않은 경우 캐스팅은 미디어를 캐스트하기 위해 임의의 포트가 있는 임시 서버를 사용합니다. DLNA 클라이언트가 서버의 콘텐츠에 액세스할 수 없거나 MediaMonkey가 캐스트할 수 없는 경우 다음 각각을 시도해 보세요.
서버가 실행 중이고 올바르게 구성되었는지 확인하세요.
MMW에서 도구 > 옵션 > 미디어 공유를 클릭하고 서버가 활성화되어 실행 중인지 확인하세요. 그렇지 않은 경우 활성화하세요.
서버를 두 번 클릭합니다(이름은 'MediaMonkey Library'와 비슷할 것입니다). 그리고 클라이언트의 IP 주소/MAC 주소가 '활성화됨' 열에서 체크되었는지 확인합니다. 나열되지 않은 경우 MMA를 사용하여 MMW UPnP/DLNA 서버에 연결해 보면 MMW에서 클라이언트에 대한 액세스를 활성화하라는 메시지를 표시합니다(또는 '모든 새 기기와 자동으로 공유'를 활성화할 수 있지만 라이브러리에 대한 액세스를 제한하려는 경우 바람직하지 않을 수 있습니다).
Windows에서 네트워크 연결이 '공용'이 아닌 '개인'으로 설정되어 있는지 확인하세요(설정 > 네트워크 및 인터넷 > 활성 네트워크를 두 번 클릭 > 네트워크 프로필을 '개인 네트워크'로 설정). 기본적으로 Windows는 네트워크 연결이 '공용'으로 설정되어 있으면 애플리케이션이 로컬 네트워크에 액세스하는 것을 차단합니다.
방화벽이 연결을 차단하고 있지 않은지 확인하세요. MediaMonkey는 일반적으로 UPnP를 활성화할 때 Windows 방화벽을 자동으로 구성하도록 도와줍니다. 하지만 타사 방화벽이 있는 경우에는 작동하지 않습니다. 방화벽을 일시적으로 비활성화하여 문제가 해결되는지 확인하세요(방화벽이 비활성화된 상태에서 라우터와 인터넷 연결을 해제하는 것이 좋습니다).
Windows 업데이트 설치 후 문제가 발생한 경우, 방화벽 설정이 재설정된 것이 원인일 수 있습니다. MMW를 최신 버전으로 업데이트해 보세요. 방화벽 규칙이 재설정되어 문제가 해결될 수 있습니다.
방화벽이 MMW로 들어오는 연결을 허용하도록 구성되어 있는지 확인하세요. 예를 들어, Windows 방화벽에서 다음 위치로 이동하세요.
제어판 > 시스템 및 보안 > Windows 방화벽 > 허용된 앱을 선택하고 MediaMonkey에 대한 비공개(또는 외부에서 액세스하는 경우 공개) 연결을 활성화합니다.
Windows 방화벽 > 고급 설정 > 인바운드 규칙 및
MMW에 구성된 TCP 포트를 통해 들어오는 UPnP 연결을 허용하는 규칙이 있는지 확인하세요(도구 > 옵션 > 미디어 공유 > 서버를 두 번 클릭 > 서버 탭을 클릭하여 확인할 수 있음).
UDP 포트 1900을 통해 들어오는 SSDP 연결을 허용하는 규칙이 있는지 확인하세요.
업데이트된 규칙이 적용되는지 확인하려면 컴퓨터를 다시 시작하세요.
다른 애플리케이션이 MediaMonkey의 미디어 서버를 차단하지 않는지 확인하세요.
Windows에서 BubbleUPnP를 사용하면 MediaMonkey가 DLNA 클라이언트에 미디어 서버를 제공하거나 다른 DLNA/Chromecast 클라이언트에 캐스팅하는 기능을 방해할 수 있습니다.
기본적인 네트워킹 관련 문제 제거:
클라이언트가 올바른 Wi-Fi 네트워크에 연결되었는지 확인하세요(Wi-Fi를 통해 연결된 경우). 게스트 Wi-Fi 네트워크는 일반적으로 장치가 동일한 네트워크의 다른 장치를 보는 것을 차단합니다.
라우터가 멀티캐스트 패킷과 UPnP 라우팅 및 검색을 지원하는지 확인하세요(대부분은 기본 제공).
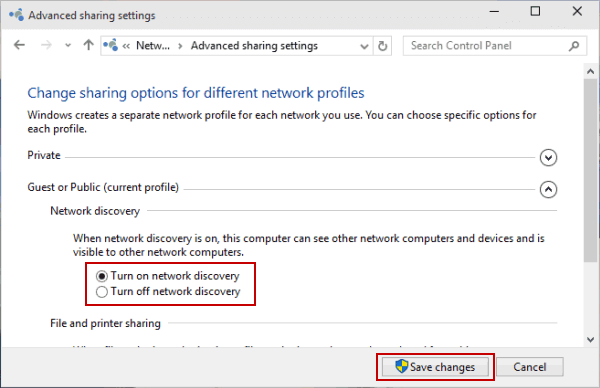
Windows PC에서 '네트워크 검색'이 활성화되어 있는지 확인하세요.
라우터가 정지된 경우 라우터를 재설정하세요(이것은 예방 조치일 뿐이며 아무것도 재구성할 필요가 없습니다)
원격 장치(예: MMA 또는 다른 UPnP 클라이언트를 실행하는 장치)에서 Wi-Fi 연결을 비활성화하거나 다시 활성화합니다.
서버 프로세스가 중지되었거나 Windows 방화벽이 유휴 상태의 UPnP/DLNA 서버를 차단한 경우 Windows용 MediaMonkey를 다시 시작하세요.
다른 고급 네트워킹 문제로 인해 문제가 발생하지 않는지 확인하세요.
서버에 네트워크 어댑터가 1개 이상 있는 경우, 서버가 원하는 네트워크 인터페이스의 서브넷 마스크에 해당하는 값으로 구성되어 있는지 확인하십시오. MMW에서 도구 > 옵션 > 미디어 공유로 이동하여 서버를 두 번 클릭하고 서버 탭을 클릭한 후 IP 주소를 자동에서 원하는 설정으로 변경하십시오.
사용 중인 TCP 포트 번호가 다른 애플리케이션과 충돌하지 않는지 확인하세요(예: Windows Media Player는 포트 2869를 사용하고, serviio는 8895를 사용함). 권장 포트 범위는 10000~25000입니다(이전 버전의 MediaMonkey에서 사용된 49152~65535). 새 포트 번호를 변경하고 테스트하려면 MMW에서 도구 > 옵션 > 미디어 공유를 클릭하고 서버를 두 번 클릭한 다음 서버 탭을 클릭하고 포트 번호를 10500으로 변경하고 방화벽이 이를 허용하도록 구성되었는지 확인하세요. 그런 다음 Android 기기에서 https://play.google.com/store/apps/details?id=com.overlook.android.fing 을 다운로드하여 설치하고 무선 네트워크를 스캔한 다음 MMW를 실행하는 PC의 IP를 열고 포트 10500이 결과에 표시되는지 확인하세요.
여러 대의 MMW 서버가 단일 데이터베이스를 공유하는 경우, 모든 서버가 공통 UUID를 사용하여 서비스하고 있어 하나의 서버만 인식될 수 있습니다. 이 문제를 해결하려면 옵션 -> 미디어 공유 -> [추가]를 통해 새 미디어 서버 인스턴스를 생성한 후 기존 인스턴스를 비활성화하세요.
네트워크 연결이 개인 또는 공개인지 확인하세요. 공개 네트워크 연결의 컴퓨터는 리소스를 공유할 수 없습니다. 네트워크 연결 트레이 아이콘을 마우스 오른쪽 버튼으로 클릭하고 "네트워크 및 공유 센터 열기"를 선택하면 네트워크 연결 및 유형을 보여주는 대화 상자가 열립니다. 공개 네트워크에 등록되어 있는 경우 네트워크 유형을 변경하고 다른 장치가 네트워크 내에서 PC를 검색할 수 있도록 허용해야 합니다.
모든 라우터와 네트워크 스위치가 점보 프레임을 지원하지 않거나 점보 프레임을 지원하도록 올바르게 구성되지 않았으므로 네트워크 어댑터 구성에서 점보 프레임을 비활성화하세요. 그렇게 하려면 다음 단계를 따르세요. Win 10: 네트워크 연결 트레이 아이콘을 마우스 오른쪽 버튼으로 클릭하고 "네트워크 및 인터넷 설정 열기" -> 이더넷 -> 어댑터 옵션 변경 -> [장치 설정을 두 번 클릭하여 열기] -> 속성 -> 구성 -> 고급 -> 점보 프레임 -> 비활성화 -> 확인 -> 확인 Win 7: 네트워크 연결 트레이 아이콘을 마우스 오른쪽 버튼으로 클릭하고 "네트워크 및 공유 센터 열기"를 선택합니다. -> 어댑터 옵션 변경 -> [장치 설정을 두 번 클릭하여 열기] -> 속성 -> 구성 -> 고급 -> 점보 프레임 -> 비활성화 -> 확인 -> 확인
VPN을 사용하는 경우, 기기 간 상호 연결을 허용하도록 VPN이 올바르게 구성되지 않았거나 멀티캐스트(SSDP 검색) 트래픽이 차단되었을 수 있습니다. 설정 방법은 VPN 설명서를 참조하세요.
참고: MMW에서 미디어 서버의 포트 번호를 4000으로 변경하면 MMW 자체 DLNA/UPnP 클라이언트가 MMW 자체에 나타나는 UPnP 서버 목록에서 해당 MMW 서버를 제외하지 않습니다. 이는 디버깅에도 유용할 수 있습니다.
Android용 MediaMonkey가 여전히 연결에 실패하면, 실패한 가용성 공지로 인해 MMA가 액세스하지 못하는 일이 없도록 서버 위치를 수동으로 저장해 보세요.
위의 모든 방법으로도 문제가 해결되지 않으면 기기/PC에서 브라우저를 열고 "http://<MMWSERVERIP>:<MMWSERVERPORT>/DeviceDescription.xml"을 입력하세요. 예: http://192.168.1.100:57302/DeviceDescription.xml . 헬프데스크를 통해 티켓을 개설하여 브라우저에 표시되는 데이터를 알려주고 MMW(및 MMA) 로그를 제공해 주세요.
최후의 수단으로 MediaMonkey를 실행하는 PC, 클라이언트, 라우터를 다시 시작하세요.
MediaMonkey DLNA / UPnP Server Inaccessible / Casting Fails
DLNA/UPnP clients or Wi-Fi Sync clients such as MediaMonkey for Android (MMA) may fail to access content shared by the MediaMonkey for Windows (MMW) DLNA server due to a variety of networking, security/access control issues, or configuration issues that prevent the server from announcing it’s availability and/or sharing content. When you Cast/Stream from MediaMonkey to a Chromecast/DLNA client MediaMonkey also requires access from your Firewall. When no Media Server is enabled in MediaMonkey casting will use a temporary server with a random port to be able to cast media. If your DLNA client can’t access content on the server or MediaMonkey can’t cast, please try each of the following:
Verify that the server is running and configured correctly:
In MMW, click Tools > Options > Media Sharing, and verify that a server is enabled and running. If it isn’t, enable it.
Double click the server (it’ll be named something like ‘MediaMonkey Library’), and make sure that the IP address/MAC address of the client is checked off in the ‘Enabled’ column. If it isn’t listed, then try connecting with MMA to the MMW UPnP/DLNA server, and MMW will prompt you to enable access to the client (alternatively, you can enable ‘Share automatically with all new devices’ though this may not be desireable if you want to limit access to the library).
Make sure that Windows is has the network connection set to Private instead of Public (Settings > Network & Internet > Double-click the active network > Set Network profile to ‘Private Network’). By default Windows will block applications from accessing the local network when the network connection is set to Public.
Ensure that your firewall isn’t blocking the connection. MediaMonkey will normally help you automatically configure the Windows firewall when enabling UPnP. But if you have a third-party firewall this will not work. Temporarily disable your firewall to see whether it solves the problems (you may want to disconnect your Router from the Internet while the Firewall is disabled).
If the problem started after installing a Windows Update, the issue may be that firewall settings were reset. Try updating to the latest version of MMW–it will reset the firewall rules, possibly solving the problem.
Make sure that your Firewall is configured to allow incoming connections to MMW. For example, on the Windows Firewall, go to:
Control Panel > System and Security > Windows Firewall > Allowed apps, and enable Private (or Public if you’re accessing it externally) connections into MediaMonkey.
Windows Firewall > Advanced Settings > Inbound rules, and
Ensure that there’s a rule allowing incoming UPnP connections over the TCP Port configured in MMW (you can see this at Tools > Options > Media Sharing > Double-click the server > Click the Server tab ).
Ensure that there’s a rule allowing incoming SSDP connections over UDP Port 1900.
Restart the machine to ensure that the updated rules are in effect.
Make sure other applications aren’t blocking MediaMonkey’s Media Server
BubbleUPnP on Windows can interfere with MediaMonkey’s ability to provide a Media Server to DLNA clients or to Cast to other DLNA/Chromecast clients.
Eliminate basic networking-related issues:
Make sure sure that that the client is connected to the correct Wi-Fi network (if connected via Wi-Fi). Guest Wi-Fi networks generally block devices from seeing other devices on the same network.
Verify that your Router supports Multicast packets and UPnP routing and discovery (most do out of the box)
Ensure that ‘Network discovery’ is enabled on your Windows PC.
Reset your router in case it is frozen (this is just precautionary–no need to reconfigure anything)
On the remote device (e.g. the one running MMA or another UPnP client), Disable/re-enable the Wi-Fi connection.
Restart MediaMonkey for Windows in case the server process stopped or Windows’ firewall blocked the UPnP/DLNA server on idle.
Verify that other more advanced networking issues aren’t causing the problem:
If your server has > 1 network adapter, make sure that the server is configured with the value corresponding to the subnet mask of the desired network interface. In MMW, go to Tools > Options > Media Sharing > Double-click the server > Click the Server tab, and change the IP address from Automatic to the desired setting.
Make sure that the TCP Port# being used doesn’t conflict with any other applications (e.g. Windows Media Player uses port 2869, serviio uses 8895, etc.). The preferred port range is between 10000 and 25000 (rather than 49152 – 65535 which was used in earlier versions of MediaMonkey). To change and test a new port number, in MMW, click Tools > Options > Media Sharing > Double-click the server > Click the Server tab, and change the Port# to 10500, for example, and make sure that the firewall is configured to allow it through. Then, on your Android device, download and install https://play.google.com/store/apps/details?id=com.overlook.android.fing , scan your wireless network, and open the IP of the PC running MMW and verify that port 10500 shows up in the results.
If you have multiple MMW servers sharing a single database, then it’s possible that they are all serving using a common UUID, resulting in only one of the servers being recognized. To solve this, create a new Media Server instance via Options -> Media Sharing -> [Add] , and then disable the old one.
Check if your Network connection is Private or Public as Computers in Public Network connections are blocked from sharing any resources. You can check that by Right clicking on Network connection tray icon and select “Open Network and Sharing Center” which will open dialog showing network connection and type. If you are registered on Public network you need to change network type and allow other devices to discover your PC within network.
Disable Jumbo frames for your network adapter configuration as not all routers and network switches support or have not configured correctly to support Jumbo frames. To do that follow these steps: Win 10: Right click on Network connection tray icon and select “Open Network and internet settings” -> Ethernet -> Change adapter options -> [DOUBLE CLICK TO OPEN YOUR DEVICE SETTINGS] -> Properties -> Configure -> Advanced -> Jumbo Frames -> Disable -> Ok -> Ok Win 7: Right clicking on Network connection tray icon and select “Open Network and Sharing Center” -> Change adapter options -> [DOUBLE CLICK TO OPEN YOUR DEVICE SETTINGS] -> Properties -> Configure -> Advanced -> Jumbo Frames -> Disable -> Ok -> Ok
If you’re using a VPN, it may not be configured correctly to allow devices to see each other or multicast (SSDP discovery) traffic is blocked. Please refer to the VPN’s documentation on how to set this up.
Note: If you change the Port# in for the media server in MMW to 4000, then MMW’s own DLNA/UPnP client will not suppress the MMW server from the list of UPnP servers that appear in MMW itself. This can be useful for debugging purposes, as well.
If MediaMonkey for Android still fails to connect, try saving the server location manually so that failed availability announcements don’t prevent MMA from accessing it:
In MMA > UPnP, click the ‘+’ button to add a media server (for a Sync server, you can also go to MMA > Options > Select Sync Server, long tap on the MMW server) and fill in the template: http://host:port/path_to_device_description_file.xml
host:port – This is the IP address and associated Port number of the MediaMonkey Server. It can be found in Tools > Options > Library > Media Sharing and appears in the format xxx.xxx.xxx.xxx:yyyyy
path_to_device_description_file.xml: this is normally DeviceDescription.xml for a MediaMonkey Server.
Save the server settings.
For the clients where you cannot add the server manually (and auto-discovery still fails) you can try restart MediaMonkey while watching the server list on the client. This may help to see the MediaMonkey server in the list finally.
If all of the above fails to resolve the problem, open a browser on your Device/PC and enter “http://<MMWSERVERIP>:<MMWSERVERPORT>/DeviceDescription.xml” e.g. http://192.168.1.100:57302/DeviceDescription.xml . Open a ticket via the helpdesk indicating what data this returns in your browser, and provide logs for MMW (and MMA).
As last resort restart the PC running MediaMonkey, the client and your Router.